Head Neck Balance – Part 3

Side view of skull - drawing

Side view of skull. Occipital condyles are 'rockers' for head neck balance.

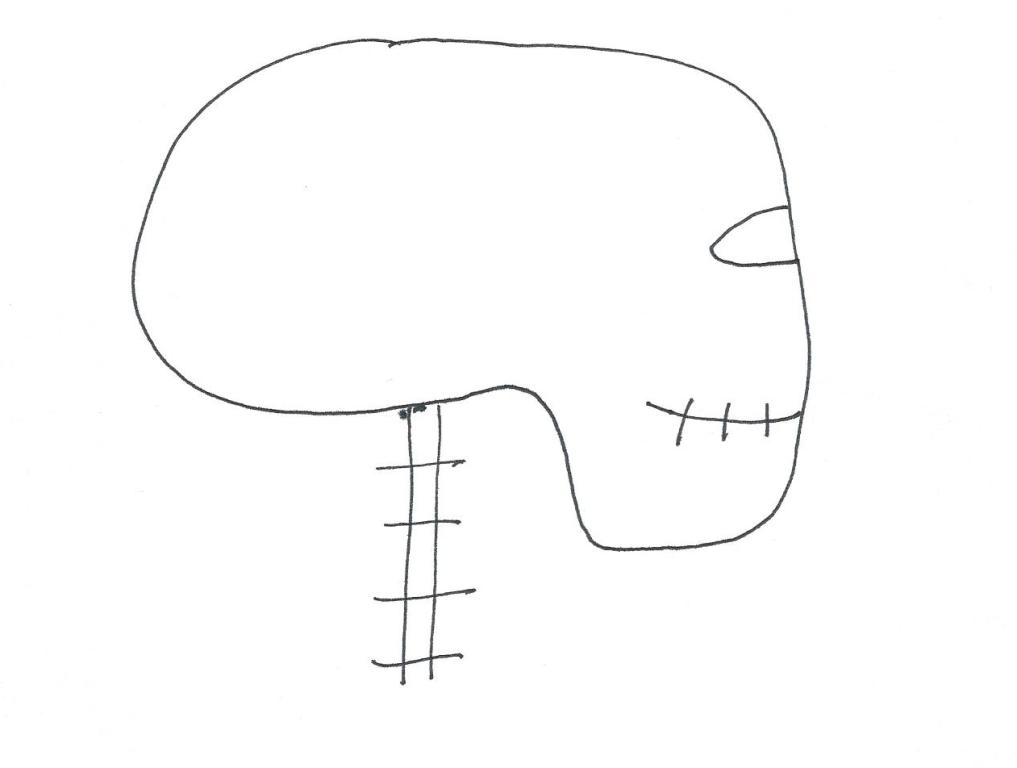
Let’s have a think about the head neck balance. The skull has two dents on its base that sit on the top vertebra. They can be thought of as two rockers that sit in the two cups of the vertebra. The drawing above shows the rocker from the side. The rockers are called occiptal condyles. A condyle is a rounded protruberance. The occiput is the bone at the base of the skull. Latin: ob – against; caput – head.

Base of Skull. Occipital condyles shown for head neck balance.

Here, at the base of the skull, we can see where they are situated. They are just in front and a bit to the sides of the foramen magnum (Latin for great hole). This is a hole in the skull through which the spinal cord passes.

Let’s now look at the top vertebra. This is called the atlas. Atlas was a Greek mythological character who is often represented as a human figure bearing the globe on his shoulders.

Drawing of atlas - top vertebra - to illustrate head neck balance

Here we are looking down at the atlas. The foramen magnum is shown in the middle. The ‘cups’ for the rockers are called facets. They are either side of the foramen magnum. The rockers sitting in the cups enable a small nodding movement. It’s a very slight movement. Any bigger nodding movements involve the bones further down the neck.

It can be helpful to think of keeping this head neck joint unlocked. We need the rockers to sit freely in the cups and not to be clamped tightly. It’s important to free up the muscles around the head neck area and we do this through thinking rather than trying to make something happen. One thought to play with is to imagine olive oil lubricating the head neck joint.

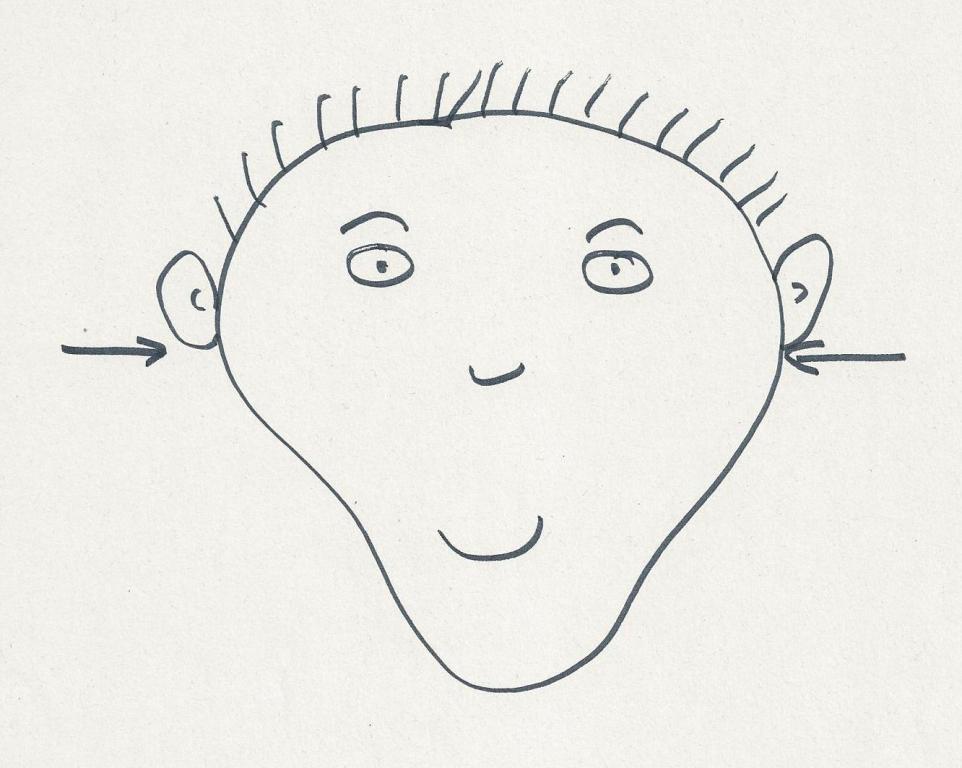
This head neck joint, the atlato-occipital joint, is located between the ears. An earlier blog post has one of my drawings showing this. As our heads weigh around 4-5 kg or 10-12 lb, Head Balance – Part 2 explains the importance of not fixing the head-neck joint.

The foot arch(es)

Drawing of the three arches of the feet. Plantar vault

Drawing of foot with arches
It’s generally assumed that each foot just has one arch that runs along the inside of the foot.  Actually, this is one of three arches.

Thinking of the base of the foot as a triangle, we can draw a line from the heel to the base knuckle of the big toe and then to the base knuckle of the little toe and back to the heel.

There is an arch between each line of the triangle. The biggest arch is the one we know about, along the inside of the foot.  The other two are less obvious, partly due to muscular padding.

Combining all three arches is known as the “plantar vault”. Plantar meaning “bottom of the foot”.

When standing, I find it useful to think of this vault giving an upthrust to the foot.  A sense of springiness.


Head Balance – Part 2

Drawing of Head Neck Balance for correct posture

Drawing of Head Neck Balance for correct posture

Having found out where the head balances on top of the neck, what next?  Our heads are very heavy – the equivalent weight of 4 to 5 litres of water. With this heavy weight on top of the body, it needs to work with us and not against us. If the head hangs down, it pulls on the neck and back. If we tilt our head back it’s also a strain on the neck, back and shoulders. Pushing our head forward to look at the computer screen also strains the neck and back.

So we want to find a natural balance point that takes the stress and tension away from the body.

We need to free the neck first. This is just a thought rather than something to do. Allow the muscles to undo tension in the neck and to not clamp or fix onto the head. Soften the jaw. And then allow the head to slightly nod forward from the balance point between the ears. Then think to free the neck again.

The head neck balance wants to be free, not fixed in one position. So we need to keep reminding the head and neck of their optimal balance as existing habits will creep back very quickly.

Head Neck Balance Part 3 shows the rockers on the base of the skull in more anatomical detail.

There is quite a bit more to this than meets the eye and this is easy to mistranslate. It really needs the skilled guidance of an Alexander Technique teacher’s hands to help. If you’d like more insight, you can come along for a one to one lesson.

Head Balance – Part 1

Drawing of Natural Head Balance restored by the Alexander Technique

Drawing of Natural Head Balance restored by the Alexander TechniqueTo find where the head balances on the neck, place a finger in the soft dent behind each ear lobe. Imagine a line going between these 2 points. The middle of this line is approximately where the head balances on the neck.

It’s often higher than people imagine it to be.

The head neck joint (or atlanto occipital joint) is a crucial balance point for the whole body.

In Head Balance Part 2 you will see how this balance point needs to be free and not fixed in place.

Why not book an introductory lesson so that  you can learn how to free your neck and let your head balance?